xbar は、実行可能なスクリプトやプログラムの出力を macOS のメニューバーに表示する、無料でオープンソースのアプリケーションです。プラグインは数行のシェルスクリプトだけでも作れますが、ドロップダウンメニュー、リンク、アクションを備えたツールも作成できます。
この記事では、最小構成のプラグインから始め、xbar が読み取る形式を説明した後、天気、Mail、電源情報、カウントダウンタイマー、GitHub 通知の実用的なプラグインを作ります。
xbarをインストールする
Homebrew
brew install --cask xbar直接ダウンロードする
xbar の Web サイト または GitHub のリリースページから最新版をダウンロードし、xbar をアプリケーションフォルダへ移動します。
現在の xbar には、macOS Catalina 10.15 以降が必要です。
プラグインディレクトリを確認する
xbar は、ローカルにインストールしたプラグインを次のディレクトリへ保存します。
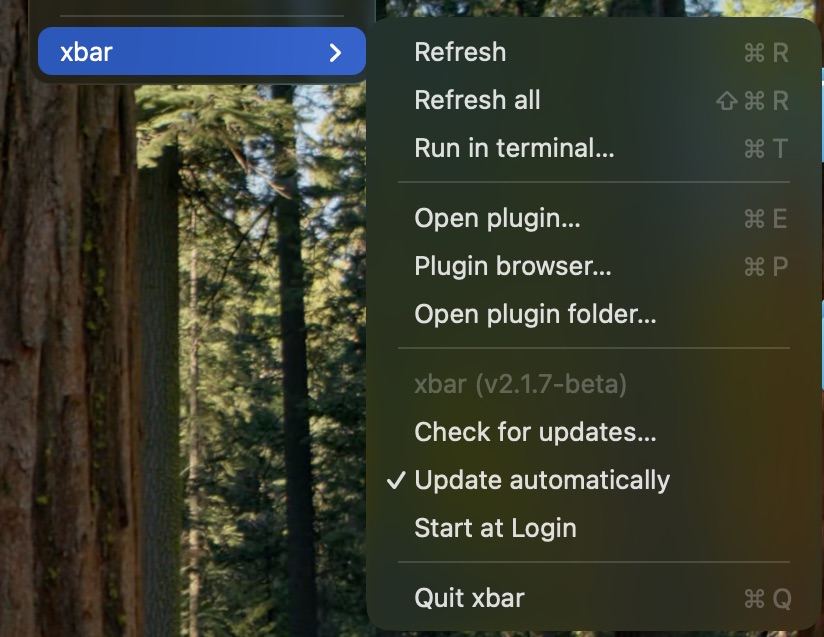
~/Library/Application Support/xbar/plugins最も簡単な確認方法は、xbar を開いて Open Plugin Folder を選択することです。Terminal から既定のディレクトリを開くこともできます。
open "$HOME/Library/Application Support/xbar/plugins"xbar からインストールしたプラグインも同じディレクトリで管理されます。コミュニティのプラグインを探すには、xbar のメニューから Plugin Browser を選択します。
最小構成のプラグインを作る
次の内容で hello.5m.sh というファイルを作成します。
1#!/usr/bin/env bash
2
3printf 'Hello from xbar\n'
4printf '%s\n' '---'
5printf 'Open the xbar website | href=https://xbarapp.com/\n'
プラグインディレクトリへコピーし、実行権限を付けます。
PLUGIN_DIR="$HOME/Library/Application Support/xbar/plugins"
cp hello.5m.sh "$PLUGIN_DIR/hello.5m.sh"
chmod +x "$PLUGIN_DIR/hello.5m.sh"
xbar から Refresh All を選択します。メニューバーに Hello from xbar と表示され、ドロップダウンメニューには xbar の Web サイトへのリンクが表示されます。
プラグイン形式を理解する
ファイル名と更新間隔
xbar は、プラグインのファイル名から更新間隔を読み取ります。
name.interval.extensionよく使う時間の単位は次のとおりです。
ms:ミリ秒。例:500mss:秒。例:30sm:分。例:5mh:時間。例:2hd:日。例:1d
ファイル名は、例えば次のようになります。
weather.30m.sh
email.1m.py
status.30s.js
更新間隔は、xbar のプラグインマネージャーから変更することもできます。<xbar.refresh> のような非公式のメタデータタグは必要ありません。定期更新の間隔はファイル名によって決まります。
メニューバーとドロップダウンの出力
xbar のプラグインは、標準出力へプレーンテキストを書き出します。
printf 'Menu bar text\n'
printf '%s\n' '---'
printf 'First dropdown item\n'
printf 'Second dropdown item\n'
最初に現れる --- だけの行が、メニューバーの出力とドロップダウンの出力を分けます。
- 最初の
---より前の行は、メニューバーに表示されます。複数の行がある場合、xbar はそれらを順番に切り替えて表示します。 - 最初の
---より後の行は、ドロップダウンメニューに表示されます。 - ドロップダウン内にある2つ目以降の
---は、区切り線になります。 --で始まる行は、サブメニューの項目になります。階層を1つ深くするたびに、ダッシュをさらに2つ追加します。
printf 'Parent item\n'
printf '%s\n' '--Child item'
printf '%s\n' '----Grandchild item'
シバンと実行権限
スクリプトの先頭には、使用するインタープリターを指定するシバン(shebang)が必要です。xbar のプロジェクトでは、/usr/bin/env の使用を推奨しています。
#!/usr/bin/env bashファイルには実行権限も必要です。
chmod +x my-plugin.5m.shリンク、アクション、書式を追加する
パイプ記号 | の後にパラメーターを追加すると、メニュー項目の表示を変更したり、操作できるようにしたりできます。
リンク
printf 'GitHub | href=https://github.com/\n'コマンド
実行ファイルを起動するには shell= を使い、引数を渡すには param1=、param2= のように記述します。
printf 'Open Mail | shell=/usr/bin/open param1=-a param2=Mail terminal=false\n'
printf 'Restart SystemUIServer | shell=/usr/bin/killall param1=SystemUIServer terminal=false refresh=true\n'名前とは異なり、以前から使われている bash= パラメーターは、シェルコマンドを自動的に解釈するものではありません。xbar は bash= を shell= の別名として受け付け、どちらも指定した実行ファイルを直接起動します。新しいプラグインでは、公式資料に記載されている shell= を使ってください。
プラグイン自身を呼び出す場合、プラグインディレクトリのパスに空白が含まれるため、パスを引用符で囲みます。
printf 'Run again | shell="%s" terminal=false refresh=true\n' "$0"よく使うアクション用のパラメーターは次のとおりです。
shell=:起動する実行ファイルparam1=、param2=、...:実行ファイルへ渡す引数terminal=true:Terminal でコマンドを実行するrefresh=true:アクションの終了後にプラグインを更新するhref=:URL を開くdisabled=true:クリックできないメニュー項目として表示する
テキストと画像
printf 'Warning | color=#D70022 font=Menlo-Bold size=13\n'
printf 'Status | templateImage=BASE64_ENCODED_TEMPLATE_IMAGE\n'
printf 'Preview | image=BASE64_ENCODED_IMAGE\n'
xbar では、色名または 16 進数の色、インストール済みフォントの名前、フォントサイズ、Base64 でエンコードした画像を指定できます。一部の SwiftBar プラグインで使われている sfimage= パラメーターには、xbar は対応していません。
メタデータとユーザー設定を追加する
メタデータには、xbar やコミュニティのプラグインリポジトリで表示するプラグインの情報を記述します。
# <xbar.title>Weather</xbar.title>
# <xbar.version>v1.0.0</xbar.version>
# <xbar.author>Kensuke</xbar.author>
# <xbar.desc>Shows the current weather in the menu bar.</xbar.desc>
# <xbar.dependencies>bash,curl</xbar.dependencies>
個人で使うローカルプラグインでは、メタデータは任意です。コミュニティのリポジトリへ投稿するプラグインには、公式のコントリビューションガイドに記載されている完全なメタデータが必要です。
プラグインマネージャーから変更できる設定を追加するには、xbar.var メタデータを使います。
# <xbar.var>string(VAR_LOCATION="Tokyo"): Location used for the weather report.</xbar.var>

LOCATION="${VAR_LOCATION:-Tokyo}"
選択した値は、xbar がプラグインを実行するときに環境変数として渡されます。
xbar の変数は、プラグインと同じ場所にある JSON ファイルへ保存されます。通常の設定には便利ですが、パスワードや API トークンを安全に保存する仕組みではありません。機密情報には macOS のキーチェーンを使ってください。
例1:天気
このプラグインは wttr.in を利用し、ネットワーク通信に失敗してもメニューバーが空にならないように処理します。
1#!/usr/bin/env bash
2# <xbar.title>Weather</xbar.title>
3# <xbar.version>v1.0.0</xbar.version>
4# <xbar.author>Kensuke</xbar.author>
5# <xbar.desc>Shows the current weather in the menu bar.</xbar.desc>
6# <xbar.dependencies>bash,curl</xbar.dependencies>
7# <xbar.var>string(VAR_LOCATION="Tokyo"): Location used for the weather report.</xbar.var>
8
9set -u
10
11LOCATION="${VAR_LOCATION:-Tokyo}"
12LOCATION_PATH=${LOCATION// /+}
13URL="https://wttr.in/${LOCATION_PATH}?format=%c+%t"
14
15if WEATHER=$(/usr/bin/curl --fail --silent --show-error --max-time 10 "$URL" 2>/dev/null); then
16  printf '🌡️ %s\n' "$WEATHER"
17else
18  printf '🌡️ Unavailable\n'
19fi
20
21printf '%s\n' '---'
22printf 'Location: %s\n' "$LOCATION"
23printf 'Refresh | refresh=true\n'
24printf 'Open wttr.in | href=https://wttr.in/%s\n' "$LOCATION_PATH"
ファイル名の 30m により、30 分ごとに更新されます。メニューの Refresh 項目を使うと、すぐに更新できます。
例2:Mailの未読件数
次のプラグインは、AppleScript を使って Mail へ問い合わせます。Mail へのアクセスに失敗したときも、何も表示せず終了するのではなく、状況がわかるエラーを表示します。
1#!/usr/bin/env bash
2# <xbar.title>Mail Unread Count</xbar.title>
3# <xbar.version>v1.0.0</xbar.version>
4# <xbar.author>Kensuke</xbar.author>
5# <xbar.desc>Shows the unread count from Mail.</xbar.desc>
6# <xbar.dependencies>bash,osascript,open</xbar.dependencies>
7
8set -u
9
10if UNREAD=$(/usr/bin/osascript \
11  -e 'tell application "Mail"' \
12  -e 'unread count of inbox' \
13  -e 'end tell' 2>/dev/null); then
14  case "$UNREAD" in
15    ''|*[!0-9]*) UNREAD=0 ;;
16  esac
17  printf '📥 %s\n' "$UNREAD"
18  ERROR_MESSAGE=""
19else
20  printf '📥 ?\n'
21  ERROR_MESSAGE="Mail access failed"
22fi
23
24printf '%s\n' '---'
25
26if [ -n "$ERROR_MESSAGE" ]; then
27  printf '%s | color=red disabled=true\n' "$ERROR_MESSAGE"
28elif [ "$UNREAD" -eq 0 ]; then
29  printf 'No unread mail | disabled=true\n'
30fi
31
32printf 'Open Mail | shell=/usr/bin/open param1=-a param2=Mail terminal=false\n'
初回実行時には、Mail を操作する権限を求められる場合があります。アクセスを拒否した場合は、システム設定 → プライバシーとセキュリティ → オートメーション にある xbar の設定を確認してください。
例3:電源とアダプターの定格
このプラグインは、バッテリー残量と、接続した電源アダプターから報告されるワット数を表示します。
1#!/usr/bin/env bash
2# <xbar.title>Power Source</xbar.title>
3# <xbar.version>v1.0.0</xbar.version>
4# <xbar.author>Kensuke</xbar.author>
5# <xbar.desc>Shows battery percentage and the connected adapter rating.</xbar.desc>
6# <xbar.dependencies>bash,pmset,system_profiler</xbar.dependencies>
7
8set -u
9
10BATTERY_OUTPUT=$(/usr/bin/pmset -g batt 2>/dev/null)
11BATTERY=$(printf '%s\n' "$BATTERY_OUTPUT" | /usr/bin/grep -Eo '[0-9]+%' | /usr/bin/head -n 1)
12BATTERY=${BATTERY:-?%}
13
14POWER_SOURCE=$(printf '%s\n' "$BATTERY_OUTPUT" | /usr/bin/head -n 1)
15
16if [[ "$POWER_SOURCE" == *"AC Power"* ]]; then
17  WATTAGE=$(/usr/sbin/system_profiler SPPowerDataType 2>/dev/null | \
18    /usr/bin/awk '/Wattage \(W\)/ {print $3; exit}')
19  if [ -n "$WATTAGE" ]; then
20    printf '⚡ %s W · %s\n' "$WATTAGE" "$BATTERY"
21  else
22    printf '🔌 %s\n' "$BATTERY"
23  fi
24else
25  printf '🔋 %s\n' "$BATTERY"
26fi
system_profiler が表示するのは、電源アダプターの定格として報告されたワット数であり、Mac が実際に消費している瞬間的な電力ではありません。また、比較的時間のかかるコマンドを頻繁に実行しないよう、更新間隔を 5 分にしています。
例4:カウントダウンタイマー
このタイマーがキャッシュディレクトリへ保存するのは、検証済みの Unix タイムスタンプだけです。状態ファイルをシェルコードとして実行せず、途中まで書き込まれたデータが見えないようにアトミックに保存します。
1#!/usr/bin/env bash
2# <xbar.title>Countdown Timer</xbar.title>
3# <xbar.version>v2.0.0</xbar.version>
4# <xbar.author>Kensuke</xbar.author>
5# <xbar.desc>Provides a configurable countdown timer.</xbar.desc>
6# <xbar.dependencies>bash,osascript</xbar.dependencies>
7
8set -u
9
10CACHE_DIR="$HOME/Library/Caches/xbar"
11STATE_FILE="$CACHE_DIR/countdown.state"
12
13now() {
14  /bin/date +%s
15}
16
17notify() {
18  /usr/bin/osascript \
19    -e "display notification \"$2\" with title \"$1\"" \
20    >/dev/null 2>&1
21}
22
23read_state() {
24  END_TIME=0
25  value=""
26
27  if [ -r "$STATE_FILE" ]; then
28    IFS= read -r value < "$STATE_FILE" || true
29  fi
30
31  case "$value" in
32    ''|*[!0-9]*) END_TIME=0 ;;
33    *) END_TIME=$value ;;
34  esac
35}
36
37write_state() {
38  /bin/mkdir -p "$CACHE_DIR"
39  umask 077
40
41  temporary_file="${STATE_FILE}.$$"
42  printf '%s\n' "$1" > "$temporary_file"
43  /bin/mv "$temporary_file" "$STATE_FILE"
44}
45
46parse_seconds() {
47  value=$1
48
49  if [[ "$value" =~ ^([0-9]+)([hms])$ ]]; then
50    number=$((10#${BASH_REMATCH[1]}))
51    unit=${BASH_REMATCH[2]}
52
53    case "$unit" in
54      h) printf '%s\n' "$((number * 3600))" ;;
55      m) printf '%s\n' "$((number * 60))" ;;
56      s) printf '%s\n' "$number" ;;
57    esac
58  elif [[ "$value" =~ ^[0-9]+$ ]]; then
59    number=$((10#$value))
60    printf '%s\n' "$((number * 60))"
61  else
62    return 1
63  fi
64}
65
66start_timer() {
67  if ! duration=$(parse_seconds "$1"); then
68    notify "xbar Timer" "Use a duration such as 25m, 90s, or 1h."
69    return 1
70  fi
71
72  write_state "$(( $(now) + duration ))"
73}
74
75case "${1:-}" in
76  start)
77    start_timer "${2:-25m}" || true
78    exit 0
79    ;;
80  custom)
81    input=$(/usr/bin/osascript \
82      -e 'display dialog "Enter a duration such as 25m, 90s, or 1h:" default answer "10m" with title "xbar Timer" buttons {"Cancel", "Start"} default button "Start"' \
83      -e 'text returned of result' 2>/dev/null) || exit 0
84    start_timer "$input" || true
85    exit 0
86    ;;
87  reset)
88    /bin/rm -f "$STATE_FILE"
89    exit 0
90    ;;
91esac
92
93read_state
94CURRENT_TIME=$(now)
95
96if [ "$END_TIME" -gt "$CURRENT_TIME" ]; then
97  REMAINING=$((END_TIME - CURRENT_TIME))
98  HOURS=$((REMAINING / 3600))
99  MINUTES=$(((REMAINING % 3600) / 60))
100  SECONDS=$((REMAINING % 60))
101
102  if [ "$HOURS" -gt 0 ]; then
103    printf -v DISPLAY '%02d:%02d:%02d' "$HOURS" "$MINUTES" "$SECONDS"
104  else
105    printf -v DISPLAY '%02d:%02d' "$MINUTES" "$SECONDS"
106  fi
107elif [ "$END_TIME" -gt 0 ]; then
108  /bin/rm -f "$STATE_FILE"
109  notify "xbar Timer" "Timer finished."
110  DISPLAY="Done"
111else
112  DISPLAY="⏱"
113fi
114
115printf '%s | font=Menlo\n' "$DISPLAY"
116printf '%s\n' '---'
117printf 'Start 25 minutes | shell="%s" param1=start param2=25m terminal=false refresh=true\n' "$0"
118printf 'Start 5 minutes | shell="%s" param1=start param2=5m terminal=false refresh=true\n' "$0"
119printf 'Custom duration | shell="%s" param1=custom terminal=false refresh=true\n' "$0"
120printf 'Reset | shell="%s" param1=reset terminal=false refresh=true\n' "$0"
ファイル名に 1s が含まれるため、xbar は表示部分を 1 秒ごとに実行します。ボタンのアクションは状態を更新または削除し、その直後に再表示を要求します。
例5:GitHub通知
この例では、macOS のキーチェーンからトークンを読み取り、HTTP 通信の失敗を処理し、GitHub から配列が返されたことを確認してから通知数を数えます。
jq が必要です。brew install jq でインストールできます。
まず、トークンをプラグインへ書き込まずに、Terminal から一度だけキーチェーンへ保存します。
read -r -s -p "GitHub token: " TOKEN
printf '\n'
/usr/bin/security add-generic-password \
  -U -a "$USER" -s "xbar-github-token" -w "$TOKEN"
unset TOKEN
次に、プラグインを作成します。
1#!/usr/bin/env bash
2# <xbar.title>GitHub Notifications</xbar.title>
3# <xbar.version>v1.0.0</xbar.version>
4# <xbar.author>Kensuke</xbar.author>
5# <xbar.desc>Shows up to 100 unread GitHub notifications.</xbar.desc>
6# <xbar.dependencies>bash,curl,jq,security</xbar.dependencies>
7
8set -u
9export PATH="/opt/homebrew/bin:/usr/local/bin:/usr/bin:/bin:/usr/sbin:/sbin"
10
11if ! command -v jq >/dev/null 2>&1; then
12  printf '🔔 ?\n'
13  printf '%s\n' '---'
14  printf 'jq is not installed | color=red disabled=true\n'
15  exit 0
16fi
17
18if ! TOKEN=$(/usr/bin/security find-generic-password \
19  -a "$USER" -s "xbar-github-token" -w 2>/dev/null); then
20  printf '🔔 ?\n'
21  printf '%s\n' '---'
22  printf 'GitHub token is not configured | color=red disabled=true\n'
23  exit 0
24fi
25
26API_URL="https://api.github.com/notifications?per_page=100"
27
28if ! RESPONSE=$(/usr/bin/curl \
29  --fail --silent --show-error --max-time 15 \
30  -H "Accept: application/vnd.github+json" \
31  -H "Authorization: Bearer ${TOKEN}" \
32  -H "X-GitHub-Api-Version: 2026-03-10" \
33  "$API_URL" 2>/dev/null); then
34  printf '🔔 ?\n'
35  printf '%s\n' '---'
36  printf 'GitHub request failed | color=red disabled=true\n'
37  exit 0
38fi
39
40COUNT=$(printf '%s' "$RESPONSE" | jq \
41  'if type == "array" then length else 0 end')
42
43if [ "$COUNT" -gt 0 ]; then
44  printf '🔔 %s\n' "$COUNT"
45else
46  printf '🔕\n'
47fi
48
49printf '%s\n' '---'
50printf 'GitHub Notifications | href=https://github.com/notifications\n'
51printf 'Refresh | refresh=true\n'
信頼できるプラグインを作る
状況がわかる出力を必ず表示する
何も出力せずにプラグインが終了すると、メニューバーの項目が消えたり、古い出力が残ったりすることがあります。想定できる失敗を処理し、短い状態表示と詳しい説明をドロップダウンに出力します。
if ! DATA=$(fetch_data); then
  printf '⚠️ Unavailable\n'
  printf '%s\n' '---'
  printf 'Could not update data | color=red disabled=true\n'
  exit 0
fi
set -e は、この処理の代わりにはなりません。多くの場合、利用者向けの出力を作らずに失敗時点で終了してしまいます。
PATH を明示する
xbar は GUI アプリケーションであるため、対話的なシェルと同じ PATH を受け取るとは限りません。jq などの追加コマンドを使う場合は、Intel MacとApple シリコン Mac の Homebrew 用ディレクトリを追加します。
export PATH="/opt/homebrew/bin:/usr/local/bin:/usr/bin:/bin:/usr/sbin:/sbin"macOS標準のツールには、/usr/bin/osascript のような絶対パスを指定すると、さらに明確です。
タイムアウトとキャッシュを使う
ネットワーク通信を 1 秒ごとに実行しないでください。ファイル名で適切な更新間隔を選び、curl などのコマンドにはタイムアウトを設定し、必要に応じて処理に時間のかかる結果をキャッシュします。
CACHE_DIR="$HOME/Library/Caches/xbar"
CACHE_FILE="$CACHE_DIR/weather.txt"
CACHE_TTL=300

/bin/mkdir -p "$CACHE_DIR"

if [ -r "$CACHE_FILE" ]; then
  MODIFIED=$(/usr/bin/stat -f %m "$CACHE_FILE" 2>/dev/null || printf '0')
  AGE=$(( $(/bin/date +%s) - MODIFIED ))

  if [ "$AGE" -lt "$CACHE_TTL" ]; then
    /bin/cat "$CACHE_FILE"
    exit 0
  fi
fi
キャッシュは、ほかの利用者も使う /tmp 内の予測可能なファイル名ではなく、~/Library/Caches/xbar へ保存します。
機密情報を保護する
トークンやパスワードをプラグインへ直接書き込まないでください。macOS のキーチェーンを使い、デバッグ出力にも機密情報を含めないようにします。xbar.var の値はプラグインの隣へ保存されるため、機密ではない設定だけに使います。
トラブルシューティング
プラグインが表示されない
ファイルが正しいディレクトリにあることを確認します。
PLUGIN_DIR="$HOME/Library/Application Support/xbar/plugins"
ls -l "$PLUGIN_DIR"
次に、実行権限とシバンを確認します。
chmod +x "$PLUGIN_DIR/my-plugin.5m.sh"
head -n 1 "$PLUGIN_DIR/my-plugin.5m.sh"
プラグインでエラーが表示される
プラグインを直接実行し、標準出力とエラーメッセージを確認します。
"$HOME/Library/Application Support/xbar/plugins/my-plugin.5m.sh"スクリプトを実行せず、Bash の構文だけを確認することもできます。
bash -n "$HOME/Library/Application Support/xbar/plugins/my-plugin.5m.sh"Terminal では動くのに xbar では動かない場合は、PATH と実行ファイルの絶対パスを確認します。また、必要なオートメーション、ファイルとフォルダ、通知の権限がシステム設定で許可されていることも確認してください。
メニューバーが混み合っている
次の macOS 設定は、xbar だけでなく、メニューバーにあるすべてのステータス項目の間隔を変更します。macOS の公式資料に記載されていない設定であり、リリースによって動作が異なる可能性があります。
defaults -currentHost write -globalDomain NSStatusItemSpacing -int 6反映するには、サインアウトしてからもう一度サインインします。数値を大きくすると間隔が広がり、小さくすると狭くなります。
参考資料
次のステップ
まずは一目で確認できると便利な値を1つ選び、処理内容に適した更新間隔を設定します。ドロップダウンのアクションは、操作が実際に簡単になる場合だけ追加しましょう。基本的なプラグインが動作したら、日常的に使い始める前に、明示的なエラー処理、タイムアウト、安全な設定方法を追加してください。